List colours with img.getcolors(maxcolors=img.width * img.height); without maxcolors it returns
None for any image with more than 256 colours. For the main colours of a photo, use
img.quantize(colors=6).getcolors() on a thumbnail. To replace a colour, build a mask with
ImageChops.difference() and paste() through it, or use a NumPy mask; both were 20–60×
faster than a putpixel() loop here. Use a tolerance when the image has anti-aliased edges.
Count the colours, and why getcolors() returns None
from PIL import Image

logo = Image.open("logo.png")                            # a flat graphic
photo = Image.open("photo.jpg")                          # a photo

print("logo getcolors():", len(logo.getcolors()), "colours")
print("photo getcolors():", photo.getcolors())           # None: more than 256 colours
colours = photo.getcolors(maxcolors=photo.width * photo.height)   # enough room for every pixel to differ
print("photo getcolors(maxcolors=w*h):", len(colours), "colours")
for count, rgb in sorted(colours, reverse=True)[:3]:
    print(f"  {count:>5} pixels  {rgb}")
print("share of the photo covered by its most common colour:", f"{max(colours)[0] / (photo.width * photo.height):.2%}")logo getcolors(): 85 colours
photo getcolors(): None
photo getcolors(maxcolors=w*h): 137168 colours
133360 pixels (2, 2, 2)
90524 pixels (1, 1, 1)
57974 pixels (3, 3, 3)
share of the photo covered by its most common colour: 7.81%getcolors() has a maxcolors limit of 256 by default and returns None when the image has
more, rather than a partial list. Passing the pixel count is always enough. The second lesson is in the top three: they are all the
same near-black ground, split into separate entries by sensor noise, and the photo's 1.7 million pixels hold over 137,000 distinct
colours. Exact counts fragment every visible colour into thousands of shades, so “the most common colour” of a photo
answers a question nobody asked; ask for its dominant colours instead.
Find the dominant colours of a photo
import json
from PIL import Image, ImageStat

photo = Image.open("photo.jpg").convert("RGB")
small = photo.copy()
small.thumbnail((200, 200))                              # far fewer pixels, same colours: much faster
q = small.quantize(colors=6, method=Image.Quantize.MEDIANCUT)
palette = q.getpalette()[:6 * 3]
counts = sorted(q.getcolors(), reverse=True)              # (count, palette index)
total = sum(n for n, _ in counts)
result = []
for n, i in counts:
    rgb = tuple(palette[i * 3:i * 3 + 3])
    print(f"#{rgb[0]:02x}{rgb[1]:02x}{rgb[2]:02x}  {n / total:6.1%}")
    result.append(["#%02x%02x%02x" % rgb, round(n / total * 100, 1)])
mean = tuple(round(v) for v in ImageStat.Stat(photo).mean)
print("average colour (ImageStat mean):", "#%02x%02x%02x" % mean, "| pixels within 20 of it:",
      f"{sum(1 for p in small.get_flattened_data() if max(abs(p[i] - mean[i]) for i in range(3)) <= 20) / total:.1%}")
print(json.dumps(result))#050404 26.0%
#554851 20.1%
#71798f 18.5%
#c0b092 13.0%
#ddc9a3 12.3%
#b0906c 10.1%
average colour (ImageStat mean): #6f635c | pixels within 20 of it: 2.6%
[["#050404", 26.0], ["#554851", 20.1], ["#71798f", 18.5], ["#c0b092", 13.0], ["#ddc9a3", 12.3], ["#b0906c", 10.1]]quantize() groups similar colours and gives each group one representative, so the counts become meaningful. Working
on a thumbnail gives nearly the same palette in a fraction of the time. MEDIANCUT (the default for RGB) balances the
groups by pixel count; FASTOCTREE is faster and also works for RGBA. For “the” average colour instead,
ImageStat.Stat(img).mean is one line, but on a photo like this it is a muddy brown that only 2.6% of the pixels come
close to.
Replace one colour: five ways, timed
import time
import numpy as np
from PIL import Image, ImageChops

logo = Image.open("logo.png").convert("RGBA")            # 600 x 360
OLD, NEW = (37, 99, 235, 255), (220, 38, 38, 255)        # blue -> red


def loop_putpixel(img):
    img = img.copy()
    for y in range(img.height):
        for x in range(img.width):
            if img.getpixel((x, y)) == OLD:
                img.putpixel((x, y), NEW)
    return img


def pixel_access(img):
    img = img.copy()
    px = img.load()
    for y in range(img.height):
        for x in range(img.width):
            if px[x, y] == OLD:
                px[x, y] = NEW
    return img


def flattened_data(img):
    out = Image.new(img.mode, img.size)
    out.putdata([NEW if p == OLD else p for p in img.get_flattened_data()])
    return out


def with_numpy(img):
    a = np.array(img)
    a[(a == OLD).all(axis=-1)] = NEW
    return Image.fromarray(a)


def pillow_only(img):
    diff = ImageChops.difference(img, Image.new("RGBA", img.size, OLD))
    mask = diff.convert("RGB").convert("L").point(lambda v: 255 if v == 0 else 0)   # 0 difference -> exact match
    mask = ImageChops.darker(mask, diff.getchannel("A").point(lambda v: 255 if v == 0 else 0))
    out = img.copy()
    out.paste(NEW, mask=mask)
    return out


reference = with_numpy(logo).tobytes()
for fn in [loop_putpixel, pixel_access, flattened_data, with_numpy, pillow_only]:
    runs = []
    for _ in range(3):
        t = time.perf_counter(); out = fn(logo); runs.append((time.perf_counter() - t) * 1000)
print(f"{fn.__name__:<15}{min(runs):9.1f} ms same result: {out.tobytes() == reference}")loop_putpixel 131.2 ms same result: True
pixel_access 19.6 ms same result: True
flattened_data 28.1 ms same result: True
with_numpy 6.1 ms same result: True
pillow_only 2.1 ms same result: TrueAll five produce the same image; the difference is speed. Calling getpixel() and putpixel() per pixel is
the slowest, and load() pixel access is several times faster. get_flattened_data() with a list
comprehension (it replaces getdata(), deprecated in Pillow 13) is simple and fast enough for small images. The two
whole-image methods win: the Pillow-only version, which builds a mask with ImageChops and pastes through it, was the
fastest here because everything stays in C, and NumPy is close behind (part of its time is copying the image into an array and
back). Use NumPy when you are already working with arrays or need more complex conditions.
Anti-aliased edges: replace with a tolerance

import numpy as np
from PIL import Image

logo = Image.open("logo.png").convert("RGBA")
OLD, NEW = np.array([37, 99, 235]), np.array([220, 38, 38])
a = np.array(logo).astype(float)
rgb, alpha = a[..., :3], a[..., 3:]

exact = a.copy()
exact[(rgb == OLD).all(axis=-1), :3] = NEW
left = ((np.abs(exact[..., :3] - OLD).sum(axis=-1) < 200) & ((exact[..., :3] != NEW).any(axis=-1)) & (alpha[..., 0] > 0))
print("exact match leaves", int(left.sum()), "blue-ish edge pixels unchanged")

# With a tolerance: how close each pixel is to OLD (0 = identical), mapped to how much to recolour (1 = fully).
distance = np.sqrt(((rgb - OLD) ** 2).sum(axis=-1))
tolerance = 260                                         # just under the distance from blue to white (269)
weight = np.clip(1 - distance / tolerance, 0, 1)[..., None] * (alpha > 0)   # leave fully transparent pixels alone
soft = a.copy()
soft[..., :3] = rgb + (NEW - OLD) * weight              # shift by the colour difference, keeps anti-aliasing
left = ((np.abs(soft[..., :3] - OLD).sum(axis=-1) < 200) & (weight[..., 0] < 1) & (weight[..., 0] > 0))
print("tolerance shifts", int(((weight > 0) & (weight < 1)).sum()), "edge pixels part of the way")

crop = (376, 148, 416, 188)                            # the edge of the white "P"
sheet = Image.new("RGB", (3 * 250, 240), "white")
for i, im in enumerate([logo, Image.fromarray(exact.astype("uint8")), Image.fromarray(soft.clip(0, 255).astype("uint8"))]):
    sheet.paste(im.crop(crop).resize((240, 240), Image.NEAREST), (i * 250, 0), im.crop(crop).resize((240, 240), Image.NEAREST))
sheet.save("fringe.png")exact match leaves 328 blue-ish edge pixels unchanged
tolerance shifts 382 edge pixels part of the waySmooth edges are made of in-between colours, so an exact match changes the solid area and leaves a ring of blue-ish pixels. The tolerance version measures each pixel's distance from the old colour and shifts it part of the way, which keeps the anti-aliasing. A good tolerance is just under the distance between the old colour and the colour it blends into at the edges, here white at 269 RGB units: edge pixels are then shifted in proportion to how much blue they contain, and the white itself is untouched. Lower it when other colours in the image are close to the one you replace. To make a colour transparent rather than recolour it, see making a background transparent.
Recolour an icon or logo
from PIL import Image

logo = Image.open("logo.png").convert("RGBA")
alpha = logo.getchannel("A")
for name, colour in [("red", (220, 38, 38)), ("green", (22, 163, 74)), ("black", (17, 17, 17))]:
    solid = Image.new("RGBA", logo.size, colour + (255,))
    solid.putalpha(alpha)                                # the logo's shape and soft edges, in one colour
    solid.save(f"logo_{name}.png")
print(name, solid.getpixel((300, 180)), "| edge pixel alpha kept:", solid.getpixel((20, 40))[3] == alpha.getpixel((20, 40)))red (220, 38, 38, 255) | edge pixel alpha kept: True
green (22, 163, 74, 255) | edge pixel alpha kept: True
black (17, 17, 17, 255) | edge pixel alpha kept: TrueFor a one-colour icon there is a cleaner way than replacing colours: keep only its alpha channel and give it a new colour. The soft edges live in the alpha channel, so they stay perfect. This is how to make white, black and brand-coloured versions of the same icon.
Shift the hue

from PIL import Image

photo = Image.open("photo.jpg").convert("RGB").resize((400, 267))
h, s, v = photo.convert("HSV").split()                   # hue 0-255 covers the full colour circle
row = Image.new("RGB", (4 * 410 - 10, 267), "white")
for i, degrees in enumerate([0, 90, 180, 270]):
    shift = round(degrees / 360 * 256)
    shifted = Image.merge("HSV", (h.point(lambda x: (x + shift) % 256), s, v)).convert("RGB")
    row.paste(shifted, (i * 410, 0))
    if degrees == 180:
        print("a sky pixel at 180 degrees:", photo.getpixel((200, 40)), "->", shifted.getpixel((200, 40)))
row.save("hue.png")
try:
    Image.open("logo.png").convert("HSV")
except ValueError as e:
print("RGBA -> HSV:", e, "| split off alpha first, then putalpha() it back")a sky pixel at 180 degrees: (99, 97, 119) -> (118, 119, 97)In Pillow's HSV mode the hue runs from 0 to 255 for the full circle, so 180° is 128, and the shift has to wrap
around with % 256. HSV has no alpha channel: split RGBA images, shift the RGB part, and put the alpha back.
Is the image blank, or a single colour?
import time
from PIL import Image, ImageStat

scan = Image.open("photo.jpg").convert("L").point(lambda v: 250 + v % 3)   # a "blank" scan: white with faint noise
tests = {
    "black": Image.new("RGB", (4000, 3000), "black"),
    "white": Image.new("RGB", (4000, 3000), "white"),
    "photo": Image.open("photo.jpg").convert("RGB"),
    "blank scan": scan,
}
for name, im in tests.items():
    t = time.perf_counter()
    single = im.getcolors(maxcolors=1)                    # None as soon as a second colour turns up
    ms = (time.perf_counter() - t) * 1000
    spread = max(ImageStat.Stat(im).stddev)
    print(f"{name:<11} one colour: {str(single[0][1]) if single else 'no':<16} ({ms:5.1f} ms)  "
f"getbbox: {str(im.getbbox()):<20} stddev {spread:5.1f}")black one colour: (0, 0, 0) ( 22.6 ms) getbbox: None stddev 0.0
white one colour: (255, 255, 255) ( 24.6 ms) getbbox: (0, 0, 4000, 3000) stddev 0.0
photo one colour: no ( 0.0 ms) getbbox: (0, 0, 1600, 1067) stddev 81.8
blank scan one colour: no ( 1.4 ms) getbbox: (0, 0, 1600, 1067) stddev 0.8getcolors(maxcolors=1) answers “is it one colour?” exactly, and stops at the second colour it finds, so
a photo is rejected in a fraction of a millisecond; only a truly uniform image costs a full pass. getbbox() is not a
blank test: it looks for non-zero pixels, so it returns None only for an all-black image. For scans and photos of
“empty” pages, where noise means no two pixels are equal, use the standard deviation from ImageStat and
a threshold: a few levels means blank, a photo is in the tens.
Map an image to a fixed palette, with or without dithering
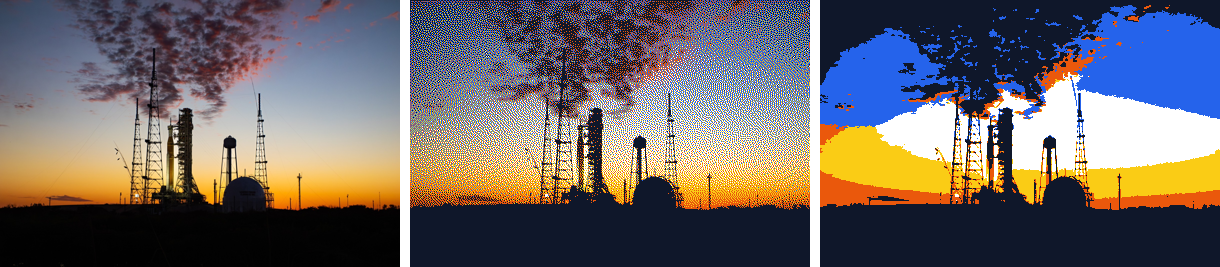
dither=Image.Dither.NONE.from PIL import Image
photo = Image.open("photo.jpg").convert("RGB").resize((400, 267))
brand = [(15, 23, 42), (255, 255, 255), (234, 88, 12), (37, 99, 235), (250, 204, 21)] # exactly these five colours
pal = Image.new("P", (1, 1))
pal.putpalette([v for rgb in brand for v in rgb])
dithered = photo.quantize(palette=pal) # Floyd-Steinberg dithering by default
flat = photo.quantize(palette=pal, dither=Image.Dither.NONE) # each pixel to the nearest colour
for name, im in [("dithered", dithered), ("no dither", flat)]:
used = {tuple(im.getpalette()[i * 3:i * 3 + 3]) for _, i in im.getcolors()}
print(f"{name:<10} uses only the palette: {used <= set(brand)} ({len(used)} colours)")
sheet = Image.new("RGB", (3 * 410 - 10, 267), "white")
for i, im in enumerate([photo, dithered.convert("RGB"), flat.convert("RGB")]):
sheet.paste(im, (i * 410, 0))
sheet.save("palette.png")dithered uses only the palette: True (5 colours)
no dither uses only the palette: True (5 colours)Build a palette image from your colours and pass it to quantize(palette=...). Dithering (the default) mixes the
colours in patterns to suggest shades in between; dither=Image.Dither.NONE gives each pixel the nearest colour,
which is what you want for pixel art, embroidery and plotter output, LED matrices and colour-by-number images.
Fill an image or an area with one colour
from PIL import Image, ImageDraw

img = Image.open("photo.jpg").convert("RGB")
img.paste((255, 255, 255), (0, 0, 400, 300))             # fill a box with one colour
img.paste((0, 0, 0), (0, 0, img.width, img.height), mask=Image.new("L", img.size, 64))   # 25% black over everything
print("white box after darkening:", img.getpixel((10, 10)), "| sky after darkening:", img.getpixel((800, 100)))
blank = Image.new("RGB", img.size, "#1e293b")            # a new image in one colour
print("new:", blank.getpixel((0, 0)), "| colours:", blank.getcolors())white box after darkening: (191, 191, 191) | sky after darkening: (49, 36, 45)
new: (30, 41, 59) | colours: [(1707200, (30, 41, 59))]paste(colour, box) fills a rectangle, and with a mask it blends the colour in, which is a quick way to darken an
image behind text. For anything other than a rectangle, draw it with ImageDraw. To read or
change single pixels, see getting and setting pixels.
Sources
What this page shows comes from running its code with Pillow 13.0.0. The API details and version history were checked against these primary sources:
- Pillow documentation: Image
- Pillow documentation: ImageChops
- Pillow documentation: ImageStat
- NumPy: numpy.asarray
Related
The outputs and images on this page are the real results of running every example with Pillow 13.0.0 on Python 3.13 (Linux) on 2026-10-29. Every example is also re-run automatically on macOS (Darwin 25.6.0, Pillow 12.3.0), Linux (Linux 6.17.0-1022-azure, Pillow 12.3.0), Windows (Windows 2025Server, Pillow 12.3.0); the line under each example shows the result per operating system. The DejaVu Sans font files sit next to each script so font examples behave the same everywhere. Sample photos: NASA/Sam Lott, public domain. Spotted something wrong? Tell us.