arr = np.asarray(img) gives a read-only array shaped (height, width, channels); use
np.array(img) if you want to modify it. img = Image.fromarray(arr) goes back, and needs
uint8 data (0–255) for normal colour images.
Image to array and back
import numpy as np
from PIL import Image

img = Image.open("photo.jpg")
arr = np.asarray(img)
print(arr.shape, arr.dtype)        # (height, width, channels)
print(arr[0, 0])                   # top-left pixel: R, G, B

back = Image.fromarray(arr)
print(back.mode, back.size) # (width, height)(1067, 1600, 3) uint8
[58 56 70]
RGB (1600, 1067)Note the axis order. NumPy indexes [row, column], so the shape is (height, width, channels), while
Pillow's img.size is (width, height). Mixing the two up is the most common source of transposed or
garbled images.
What each mode becomes
The array's shape and dtype depend on the image mode. We converted the same photo to every common mode:
import numpy as np
from PIL import Image

base = Image.open("photo.jpg")
for mode in ["1", "L", "P", "RGB", "RGBA", "LA", "CMYK", "I", "I;16", "F"]:
    img = base.convert(mode) if mode != "I;16" else base.convert("I").point(lambda v: v * 256).convert("I;16")
    arr = np.asarray(img)
print(f"{mode:<5} -> shape {str(arr.shape):<16} dtype {arr.dtype}")1 -> shape (1067, 1600) dtype bool
L -> shape (1067, 1600) dtype uint8
P -> shape (1067, 1600) dtype uint8
RGB -> shape (1067, 1600, 3) dtype uint8
RGBA -> shape (1067, 1600, 4) dtype uint8
LA -> shape (1067, 1600, 2) dtype uint8
CMYK -> shape (1067, 1600, 4) dtype uint8
I -> shape (1067, 1600) dtype int32
I;16 -> shape (1067, 1600) dtype uint16
F -> shape (1067, 1600) dtype float32Two surprises: mode "1" becomes a boolean array, not 0/255, and palette images ("P")
give the palette indices, not colours. Convert to "L" or "RGB" first if you want brightness or colour values.
ValueError: assignment destination is read-only
np.asarray() returns an array you cannot modify:
import numpy as np
from PIL import Image

arr = np.asarray(Image.open("photo.jpg"))
arr[0, 0] = (255, 0, 0)ValueError: assignment destination is read-onlyUse np.array(), which makes a writable copy (or call arr = arr.copy()):
import numpy as np
from PIL import Image

arr = np.array(Image.open("photo.jpg"))     # np.array copies; the copy is writable
arr[:50, :50] = (255, 0, 0)                  # paint the top-left corner red
print(arr.flags.writeable)
Image.fromarray(arr).save("red_corner.jpg")TrueArray to image: which dtypes work
Image.fromarray() chooses the mode from the dtype and shape. Here is every common combination, including the two that fail:
import numpy as np
from PIL import Image

h, w = 3, 4
cases = {
    "uint8 (h, w)": np.zeros((h, w), np.uint8),
    "uint8 (h, w, 3)": np.zeros((h, w, 3), np.uint8),
    "uint8 (h, w, 4)": np.zeros((h, w, 4), np.uint8),
    "bool (h, w)": np.zeros((h, w), bool),
    "uint16 (h, w)": np.zeros((h, w), np.uint16),
    "int32 (h, w)": np.zeros((h, w), np.int32),
    "float32 (h, w)": np.zeros((h, w), np.float32),
    "float64 (h, w)": np.zeros((h, w), np.float64),
    "int64 (h, w)": np.zeros((h, w), np.int64),
    "float32 (h, w, 3)": np.zeros((h, w, 3), np.float32),
}
for label, arr in cases.items():
    try:
        print(f"{label:<18} -> mode {Image.fromarray(arr).mode}")
    except TypeError as e:
print(f"{label:<18} -> TypeError: {e}")uint8 (h, w) -> mode L
uint8 (h, w, 3) -> mode RGB
uint8 (h, w, 4) -> mode RGBA
bool (h, w) -> mode 1
uint16 (h, w) -> mode I;16
int32 (h, w) -> mode I
float32 (h, w) -> mode F
float64 (h, w) -> mode F
int64 (h, w) -> TypeError: Cannot handle this data type: (1, 1), <i8
float32 (h, w, 3) -> TypeError: Cannot handle this data type: (1, 1, 3), <f4The int64 failure catches many people: it is NumPy's default integer type on Linux and macOS, so arrays built with
np.zeros((h, w), dtype=int) or from integer arithmetic fail. Colour float arrays fail too. Both are fixed by converting
to uint8, as below. The full explanation is on
TypeError: Cannot handle this data type.
Black (or noisy) images from fromarray
Floats in 0..1
Images normalised to 0–1 (common in machine learning) turn black if you cast them straight to uint8,
because every value truncates to 0 or 1:
import numpy as np
from PIL import Image

gray = np.asarray(Image.open("photo.jpg").convert("L")) / 255.0   # floats 0.0 .. 1.0
print(gray.dtype, gray.min(), gray.max())

wrong = Image.fromarray(gray.astype(np.uint8))       # 0.0..1.0 truncated to 0 or 1
print("wrong:", wrong.getextrema())

right = Image.fromarray((gray * 255).round().astype(np.uint8))
print("right:", right.getextrema())float64 0.0 1.0
wrong: (0, 1)
right: (0, 255)Values outside 0..255
After arithmetic, values can exceed 255 or go negative. Casting to uint8 wraps them around instead of capping
them, which produces speckled garbage. Clip first:
import numpy as np
from PIL import Image

arr = np.asarray(Image.open("photo.jpg"), dtype=np.int16)
brighter = arr + 80                                   # some values now exceed 255

overflow = Image.fromarray(brighter.astype(np.uint8))           # wraps around: 300 -> 44
clipped = Image.fromarray(np.clip(brighter, 0, 255).astype(np.uint8))

w = 400
sheet = Image.new("RGB", (2 * w + 10, 267), "white")
sheet.paste(overflow.resize((w, 267)), (0, 0))
sheet.paste(clipped.resize((w, 267)), (w + 10, 0))
sheet.save("clip.png")
print("max before clipping:", brighter.max())max before clipping: 335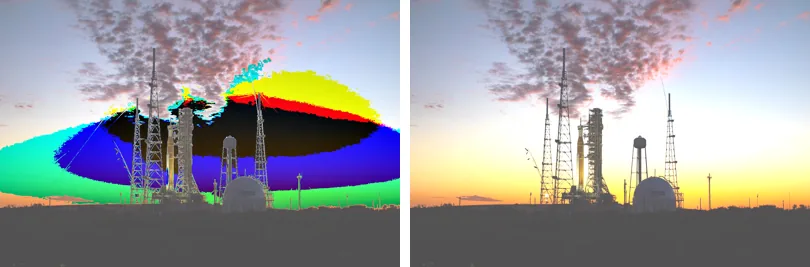
astype(np.uint8) without clipping (bright areas wrap to dark). Right: np.clip(..., 0, 255) first.Apply a matplotlib colormap
To turn a 2-D array (a heat map, depth map or scientific data) into a coloured image, let matplotlib map values to colours, then convert the 0..1 floats to bytes:
import numpy as np
from matplotlib import colormaps
from PIL import Image

# Any 2-D data: here, the brightness of the photo, scaled to 0..1.
data = np.asarray(Image.open("photo.jpg").convert("L"), dtype=np.float32) / 255

rgba = colormaps["magma"](data)                  # floats 0..1, shape (h, w, 4)
img = Image.fromarray((rgba[..., :3] * 255).astype(np.uint8))
img.save("magma.png")
print(rgba.shape, rgba.dtype, "->", img.mode, img.size)(1067, 1600, 4) float64 -> RGB (1600, 1067)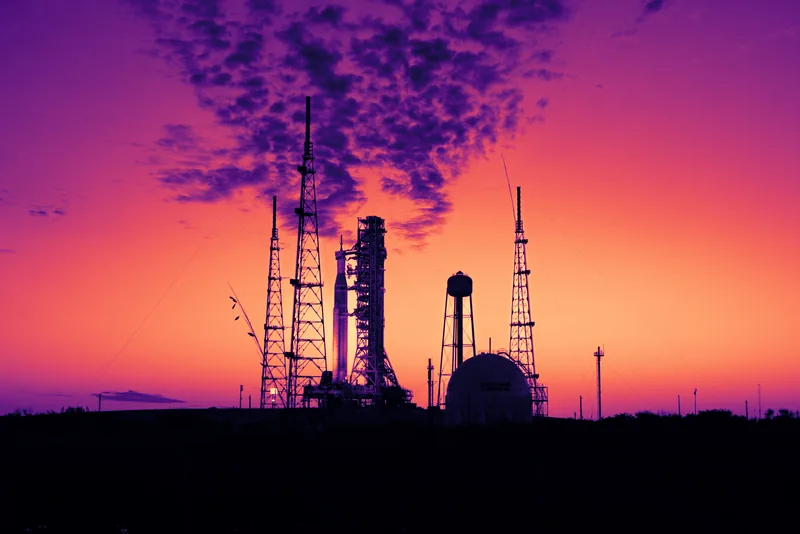
Working with channels
import numpy as np
from PIL import Image

arr = np.array(Image.open("photo.jpg"))
r, g, b = arr[..., 0], arr[..., 1], arr[..., 2]
print("mean R, G, B:", round(r.mean(), 1), round(g.mean(), 1), round(b.mean(), 1))

swapped = arr[..., ::-1]                         # RGB -> BGR (what OpenCV expects)
print(arr[0, 0], "->", swapped[0, 0])

alpha = np.full(arr.shape[:2] + (1,), 255, np.uint8)
rgba = np.concatenate([arr, alpha], axis=2)
print(Image.fromarray(rgba).mode)mean R, G, B: 110.8 99.4 91.8
[58 56 70] -> [70 56 58]
RGBAFor OpenCV, which stores colour as BGR, see converting between Pillow and OpenCV.
Related
The outputs and images on this page are the real results of running every example with Pillow 12.3.0 on Python 3.13 (Linux) on 2026-10-15. Every example is also re-run automatically on macOS (Darwin 25.6.0, Pillow 12.3.0), Linux (Linux 6.17.0-1022-azure, Pillow 12.3.0), Windows (Windows 2025Server, Pillow 12.3.0); the line under each example shows the result per operating system. The DejaVu Sans font files sit next to each script so font examples behave the same everywhere. Sample photos: NASA/Sam Lott, public domain. Spotted something wrong? Tell us.