One pixel: img.getpixel((x, y)) and img.putpixel((x, y), value). Many pixels:
px = img.load(), then px[x, y]. Every pixel, or any maths on pixels: convert to NumPy with
np.array(img) (indexed [y, x]) and back with Image.fromarray().
Read one pixel
from PIL import Image

img = Image.open("photo.jpg")
print(img.mode, img.size)
print("top-left:", img.getpixel((0, 0)))          # (x, y): column first, then row
print("rocket:  ", img.getpixel((690, 600)))
print("ground: ", img.getpixel((800, 1000)))RGB (1600, 1067)
top-left: (58, 56, 70)
rocket: (79, 55, 11)
ground: (1, 1, 1)Coordinates are (x, y) from the top-left corner, starting at 0. The last valid pixel is
(img.width - 1, img.height - 1); one more raises IndexError: image index out of range.
What you get back depends on the mode
The same pixel, converted to different modes:
from PIL import Image

rgb = Image.open("photo.jpg")
for mode in ["RGB", "RGBA", "L", "1", "CMYK", "F"]:
    print(f"{mode:<5}", rgb.convert(mode).getpixel((690, 600)))

gif = Image.open("spinner.gif")                    # palette image
print("P    ", gif.getpixel((50, 80)), "<- an index into the palette, not a colour")
print("P->RGB", gif.convert("RGB").getpixel((50, 80)))RGB (79, 55, 11)
RGBA (79, 55, 11, 255)
L 57
1 0
CMYK (176, 200, 244, 0)
F 57.15999984741211
P 0 <- an index into the palette, not a colour
P->RGB (37, 99, 235)Two surprises here. Greyscale (L), 1-bit and float images give a single number, not a tuple, so code like
r, g, b = img.getpixel(...) breaks on them. And palette (P) images, which includes most GIFs and many
small PNGs, give the palette index. Convert to RGB (or RGBA) first if you want colours. Not
sure which mode you have? Print img.mode; the image info guide lists them.
Pillow is (x, y), NumPy is [y, x]
import numpy as np
from PIL import Image

img = Image.open("photo.jpg")
a = np.asarray(img)
print(a.shape)                                     # (height, width, channels)
print("Pillow (x, y):  ", img.getpixel((690, 600)))
print("NumPy [y, x]:   ", a[600, 690].tolist())   # rows first
print("NumPy [x, y]: ", a[690, 600].tolist(), "<- a different pixel")(1067, 1600, 3)
Pillow (x, y): (79, 55, 11)
NumPy [y, x]: [79, 55, 11]
NumPy [x, y]: [182, 148, 77] <- a different pixelA NumPy array is indexed by row, then column. Swapping them does not raise an error while both numbers are in range, it just reads the wrong pixel, which makes this bug hard to spot.
Get all pixels
from PIL import Image

img = Image.open("photo.jpg").resize((4, 2))
pixels = list(img.get_flattened_data())            # Pillow 12.1+; replaces getdata()
print(len(pixels), "pixels, row by row:")
print(pixels[:4])
print(pixels[4:])8 pixels, row by row:
[(122, 122, 131), (112, 101, 107), (142, 129, 137), (143, 150, 164)]
[(117, 91, 59), (101, 84, 60), (108, 93, 69), (136, 110, 69)]getdata(), which most older answers use, is deprecated: in Pillow 12.3 it prints
DeprecationWarning: Image.Image.getdata is deprecated and will be removed in Pillow 14 (2027-10-15). Use
get_flattened_data instead.
Both return pixels row by row. For a 2-D structure, use NumPy.
Change pixels
from PIL import Image

img = Image.open("photo.jpg")

img.putpixel((10, 10), (255, 0, 0))                # one pixel

px = img.load()                                    # pixel access object: px[x, y]
for x in range(100, 300):
    for y in range(100, 110):
        px[x, y] = (255, 255, 0)                   # assign a whole new tuple
print(img.getpixel((10, 10)), img.getpixel((150, 105)))(255, 0, 0) (255, 255, 0)Pixel values are tuples, and tuples cannot be modified in place. Changing one channel does not work:
from PIL import Image

img = Image.open("photo.jpg")
px = img.load()
px[0, 0][0] = 255 # try to change only the red valueTraceback (most recent call last):
...
TypeError: 'tuple' object does not support item assignmentBuild a new tuple instead: r, g, b = px[x, y]; px[x, y] = (255, g, b). The
error page has the details, including the NumPy
variant (assignment destination is read-only).
How fast is each method?
Summing the red channel of every pixel of the 1600×1067 photo, four ways:
import time
import numpy as np
from PIL import Image

img = Image.open("photo.jpg")
w, h = img.size


def timed(label, fn):
    t = time.perf_counter(); out = fn(); dt = time.perf_counter() - t
    print(f"{label:<34} {dt * 1000:8.1f} ms")
    return out


def with_getpixel():
    return sum(img.getpixel((x, y))[0] for y in range(h) for x in range(w))


def with_load():
    px = img.load()
    return sum(px[x, y][0] for y in range(h) for x in range(w))


def with_flattened():
    return sum(p[0] for p in img.get_flattened_data())


def with_numpy():
    return int(np.asarray(img)[:, :, 0].sum())


results = [timed("getpixel() in a loop", with_getpixel),
           timed("load() then px[x, y]", with_load),
           timed("get_flattened_data()", with_flattened),
           timed("NumPy", with_numpy)]
print("all agree:", len(set(results)) == 1)getpixel() in a loop 1128.6 ms
load() then px[x, y] 155.9 ms
get_flattened_data() 310.8 ms
NumPy 8.3 ms
all agree: Truegetpixel() was about 7× slower than indexing the object returned by load(), because every call goes through a method lookup and argument checks. NumPy did the whole job in C, about 19× faster than the fastest Python loop and over 130× faster than getpixel(). Absolute times depend on the machine; the ranking does not.
Change colours by condition (with NumPy)
Most "change all pixels that…" tasks are one line of NumPy: build a boolean mask, assign to it.
import numpy as np
from PIL import Image

a = np.array(Image.open("photo.jpg"))              # np.array copies, so it is writable
r, g, b = a[..., 0].astype(int), a[..., 1].astype(int), a[..., 2].astype(int)

sky = (b > r + 30) & (b > 120)                     # blue-ish and bright
a[sky] = (25, 25, 60)                              # paint the clear sky dark blue

dark = a.sum(axis=2) < 60                          # near-black silhouette
a[dark] = (255, 255, 255)

Image.fromarray(a).save("recoloured.jpg")
print(f"sky pixels: {sky.mean():.0%}, silhouette pixels: {dark.mean():.0%}")sky pixels: 11%, silhouette pixels: 25%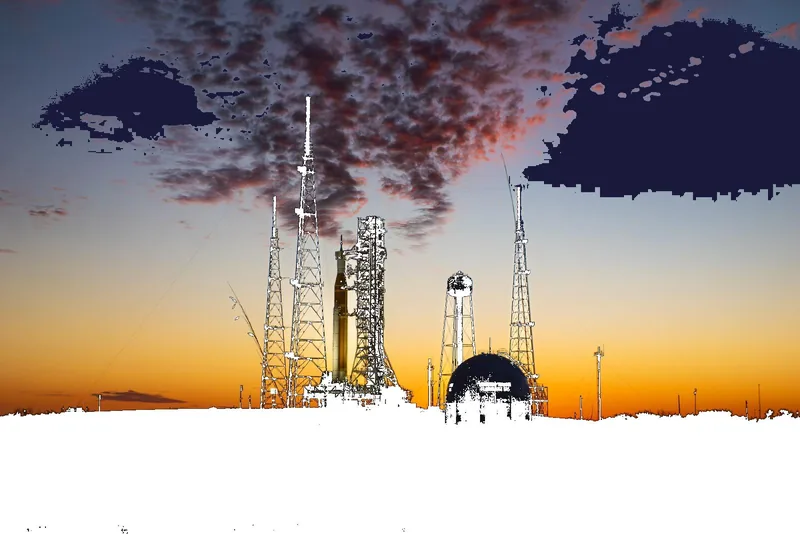
Note .astype(int) before the comparisons: arithmetic on uint8 wraps around at 256, so
r + 30 on a bright pixel would silently become a small number.
Related
The outputs and images on this page are the real results of running every example with Pillow 12.3.0 on Python 3.13 (Linux) on 2026-10-15. Every example is also re-run automatically on macOS (Darwin 25.6.0, Pillow 12.3.0), Linux (Linux 6.17.0-1022-azure, Pillow 12.3.0), Windows (Windows 2025Server, Pillow 12.3.0); the line under each example shows the result per operating system. The DejaVu Sans font files sit next to each script so font examples behave the same everywhere. Sample photos: NASA/Sam Lott, public domain. Spotted something wrong? Tell us.