Convert to RGBA, set alpha to 0 where the pixel is close to white (not exactly white), and save as PNG or WebP. If the subject contains white too, flood-fill from the corners instead, so only background connected to the border is removed. Tolerance and flood fill are both one or two lines.
Attempt 1: exact white
This is the most-copied answer:
from PIL import Image

img = Image.open("logo_white.jpg").convert("RGBA")
new = [(255, 255, 255, 0) if p[:3] == (255, 255, 255) else p for p in img.get_flattened_data()]
img.putdata(new)
img.save("exact.png")                    # PNG: JPEG cannot store transparency

n = sum(1 for p in new if p[3] == 0)
print(f"made transparent: {n / len(new):.1%} of pixels")made transparent: 71.8% of pixelsIt works on PNG graphics. On a JPEG it leaves specks and a band of near-white pixels around edges, because JPEG compression turns pure white into values like (254, 255, 253) near anything that is not white. It is also slow (a Python loop over every pixel) and, as the comparison below shows, it removes the white circle inside the logo too.
Attempt 2: a tolerance, with NumPy
import numpy as np
from PIL import Image

a = np.array(Image.open("logo_white.jpg").convert("RGBA"))
rgb = a[..., :3].astype(int)

exact = (rgb == 255).all(axis=2)
near = (rgb >= 235).all(axis=2)                # every channel within 20 of white
print(f"exactly white: {exact.mean():.1%}   near white: {near.mean():.1%}")

a[near, 3] = 0
Image.fromarray(a).save("tolerance.png")exactly white: 71.8% near white: 75.4%Fast, and catches the JPEG noise. But it still cannot tell background white from white that belongs to the subject.
Attempt 3: flood fill from the edges
ImageDraw.floodfill() only changes pixels connected to the starting point, like the paint-bucket tool. Starting
from the four corners removes the page but keeps the white circle and lettering:
from PIL import Image, ImageDraw

img = Image.open("logo_white.jpg").convert("RGBA")
for corner in [(0, 0), (img.width - 1, 0), (0, img.height - 1), (img.width - 1, img.height - 1)]:
    ImageDraw.floodfill(img, corner, (255, 255, 255, 0), thresh=40)   # only pixels connected to the border
img.save("flood.png")
print("circle centre:", img.getpixel((280, 330)), " background:", img.getpixel((5, 5)))circle centre: (255, 255, 255, 255) background: (255, 255, 255, 0)thresh is the tolerance: how far a pixel's colour may be from the start colour and still be filled.
Best: flood fill plus soft edges
Hard cut-offs leave a light fringe of edge pixels that are part blue, part white. Three steps fix it: make those pixels partly transparent in proportion to how white they are, remove the white from their colour, and trim the outermost one-pixel ring. That last step matters for JPEGs, which store colour at half resolution, so the edge ring has a greyish, smeared colour that no formula can recover; skipping it leaves a faint grey halo on dark backgrounds.
import numpy as np
from PIL import Image, ImageDraw, ImageFilter

img = Image.open("logo_white.jpg").convert("RGBA")

# 1. Which pixels are background? Flood fill a marker colour from the corners.
marked = img.copy()
for corner in [(0, 0), (img.width - 1, 0), (0, img.height - 1), (img.width - 1, img.height - 1)]:
    ImageDraw.floodfill(marked, corner, (255, 0, 255, 0), thresh=60)
background = (np.array(marked) == (255, 0, 255, 0)).all(axis=2)

# 2. Alpha from "distance from white", ramping from 0 (white) to 1 (clearly not white).
rgb = np.array(img)[..., :3].astype(float)
distance = (255 - rgb).max(axis=2)
alpha = np.clip((distance - 8) / (60 - 8), 0, 1)
alpha[~background] = 1                           # never touch the subject itself

# 3. Take the white back out of edge pixels: observed = alpha * colour + (1 - alpha) * white
colour = (rgb - (1 - alpha[..., None]) * 255) / np.maximum(alpha[..., None], 1e-6)
out = Image.fromarray(np.clip(colour, 0, 255).astype(np.uint8))

# 4. Shrink the alpha by one pixel: drops the outermost ring, whose colour JPEG has smeared
mask = Image.fromarray((alpha * 255).astype(np.uint8)).filter(ImageFilter.MinFilter(3))
out.putalpha(mask)
out.save("soft.png")
print(f"transparent: {(np.array(mask) == 0).mean():.1%}, partly transparent edge: {((np.array(mask) > 0) & (np.array(mask) < 255)).mean():.2%}")transparent: 68.3%, partly transparent edge: 0.33%The four results side by side
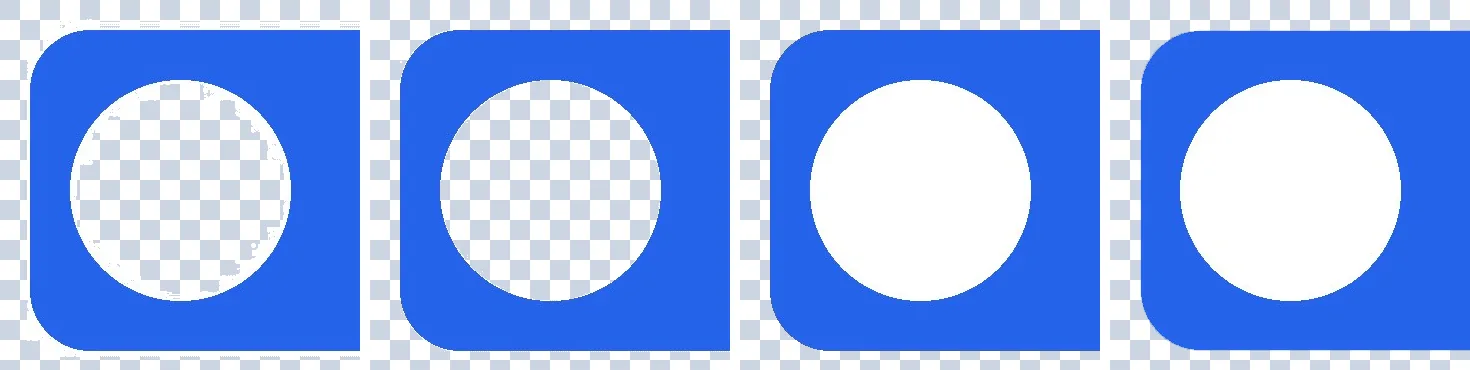
from PIL import Image, ImageDraw
def on_checkerboard(img, sq=20):
    bg = Image.new("RGBA", img.size, "white")
    d = ImageDraw.Draw(bg)
    for y in range(0, img.height, sq):
        for x in range((y // sq % 2) * sq, img.width, 2 * sq):
            d.rectangle((x, y, x + sq - 1, y + sq - 1), fill="#cbd5e1")
    return Image.alpha_composite(bg, img.convert("RGBA")).convert("RGB")

names = ["exact.png", "tolerance.png", "flood.png", "soft.png"]
tiles = [on_checkerboard(Image.open(n)).crop((100, 140, 460, 510)) for n in names]
sheet = Image.new("RGB", (4 * 370 - 10, 370), "white")
for i, t in enumerate(tiles):
    sheet.paste(t, (i * 370, 0))
sheet.save("compare.png")

# Zoom on the top-left corner over a dark background, where a light fringe shows up
zooms = []
for n in ["flood.png", "soft.png"]:
    dark = Image.new("RGBA", (900, 620), "#0f172a")
    dark.alpha_composite(Image.open(n))
    zooms.append(dark.crop((122, 162, 182, 222)).resize((300, 300), Image.NEAREST))
edges = Image.new("RGB", (610, 300), "white")
edges.paste(zooms[0], (0, 0))
edges.paste(zooms[1], (310, 0))
edges.save("edges.png")The difference between the last two is at the edges. Zoomed in 5× on a corner, composited onto a dark background:

For photos with complex backgrounds (hair, shadows), colour rules are not enough; a segmentation model such as the
rembg package produces the alpha mask, and Pillow applies it with img.putalpha(mask).
Replace one colour with another
The same masking idea recolours pixels. On a PNG with flat colours an exact match is fine:
import numpy as np
from PIL import Image

a = np.array(Image.open("logo.png"))                      # RGBA
blue = (a[..., :3] == (37, 99, 235)).all(axis=2)           # exact match is fine for a PNG
a[blue, :3] = (220, 38, 38)                                # recolour, keep the alpha
Image.fromarray(a).save("red_logo.png")
print(f"recoloured {blue.sum():,} pixels")recoloured 135,330 pixels
Look closely at the lettering: its anti-aliased edge pixels are mixtures of white and blue, so they don't match exactly and keep a blue fringe. For a clean result on those, match with a tolerance (as in attempt 2) or recolour by hue.
Related
The outputs and images on this page are the real results of running every example with Pillow 12.3.0 on Python 3.13 (Linux) on 2026-10-15. Every example is also re-run automatically on macOS (Darwin 25.6.0, Pillow 12.3.0), Linux (Linux 6.17.0-1022-azure, Pillow 12.3.0), Windows (Windows 2025Server, Pillow 12.3.0); the line under each example shows the result per operating system. The DejaVu Sans font files sit next to each script so font examples behave the same everywhere. Sample photos: NASA/Sam Lott, public domain. Spotted something wrong? Tell us.