Fix a dull photo with ImageOps.autocontrast(img, cutoff=1); fit into a box with
contain, cover, fit or pad; rotate phone photos upright with
exif_transpose(img). Most functions accept L and RGB; for RGBA, split off the alpha
channel first. Pillow 13 added palette (P) support to invert, posterize and
solarize.
Common operations side by side
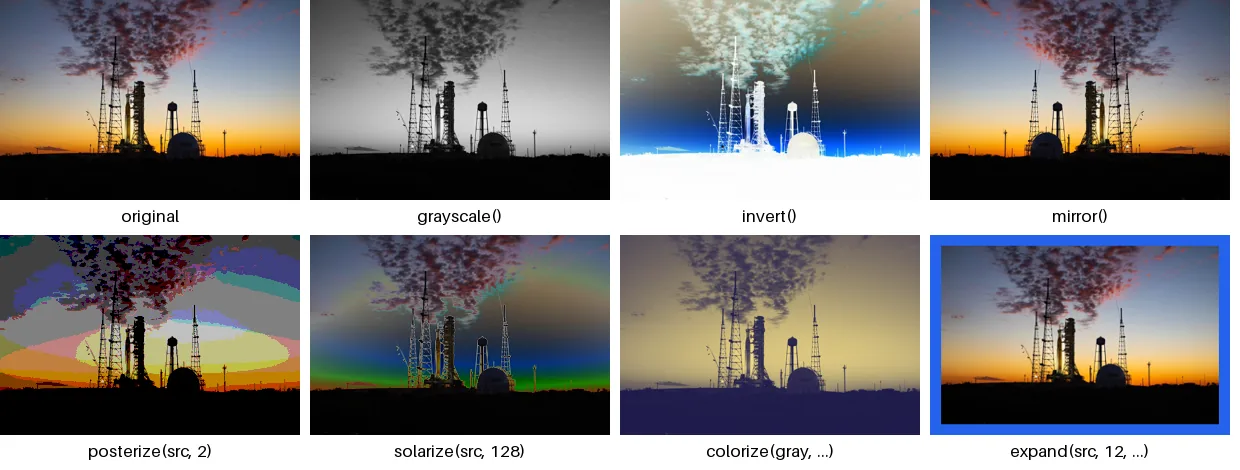
from PIL import Image, ImageDraw, ImageFont, ImageOps

src = Image.open("photo.jpg").resize((300, 200))
ops = {
    "original": src,
    "grayscale()": ImageOps.grayscale(src),
    "invert()": ImageOps.invert(src),
    "mirror()": ImageOps.mirror(src),
    "posterize(src, 2)": ImageOps.posterize(src, 2),
    "solarize(src, 128)": ImageOps.solarize(src, 128),
    "colorize(gray, ...)": ImageOps.colorize(ImageOps.grayscale(src), black="#1e1b4b", white="#fde68a"),
    "expand(src, 12, ...)": ImageOps.expand(src, border=12, fill="#2563eb").resize((300, 200)),
}
font = ImageFont.load_default(size=17)
cols = 4
sheet = Image.new("RGB", (cols * 310, 2 * 235), "white")
for i, (label, im) in enumerate(ops.items()):
    x, y = (i % cols) * 310, (i // cols) * 235
    sheet.paste(im.convert("RGB"), (x, y))
    ImageDraw.Draw(sheet).text((x + 150, y + 215), label, font=font, fill="black", anchor="mm")
sheet.save("imageops.png")Fit into a box: contain, cover, fit, pad, scale
Five functions resize while keeping the aspect ratio; they differ in what happens when the box has another shape than the image:
from PIL import Image, ImageOps

img = Image.open("photo.jpg")                 # 1600 x 1067, landscape
box = (500, 500)
print("contain  ", ImageOps.contain(img, box).size, "  fits inside, keeps ratio")
print("cover    ", ImageOps.cover(img, box).size, "  fills the box, one side larger")
print("fit      ", ImageOps.fit(img, box).size, "  fills exactly, crops the overflow")
print("pad      ", ImageOps.pad(img, box, color="white").size, "  fits inside, pads to exactly the box")
print("scale 0.25", ImageOps.scale(img, 0.25).size, "  multiplies both sides")

# fit() and pad() take centering: (0, 0) keeps the top-left, (1, 1) the bottom-right
left = ImageOps.fit(img, box, centering=(0.0, 0.5))
right = ImageOps.fit(img, box, centering=(1.0, 0.5))
print("fit, centering left vs right differ:", left.tobytes() != right.tobytes())contain (500, 333) fits inside, keeps ratio
cover (750, 500) fills the box, one side larger
fit (500, 500) fills exactly, crops the overflow
pad (500, 500) fits inside, pads to exactly the box
scale 0.25 (400, 267) multiplies both sides
fit, centering left vs right differ: Truefit() is the one for square thumbnails and avatars; move centering towards where the subject is.
pad() is the one for letterboxing into a fixed size. The
resizing guide shows all five side by side on images and measures their speed.
autocontrast() vs equalize()
from PIL import Image, ImageOps

# Simulate a flat, washed-out scan by squeezing all tones into a narrow band.
flat = Image.open("photo.jpg").convert("L").point(lambda v: 90 + v * 80 // 255)
auto = ImageOps.autocontrast(flat, cutoff=1)
equal = ImageOps.equalize(flat)

for name, im in [("flat", flat), ("autocontrast", auto), ("equalize", equal)]:
    print(f"{name:<13} darkest={im.getextrema()[0]:3}  brightest={im.getextrema()[1]:3}")

sheet = Image.new("L", (3 * 410, 267), 255)
for i, im in enumerate([flat, auto, equal]):
    sheet.paste(im.resize((400, 267)), (i * 410, 0))
sheet.save("contrast.png")flat darkest= 90 brightest=170
autocontrast darkest= 0 brightest=255
equalize darkest= 0 brightest=255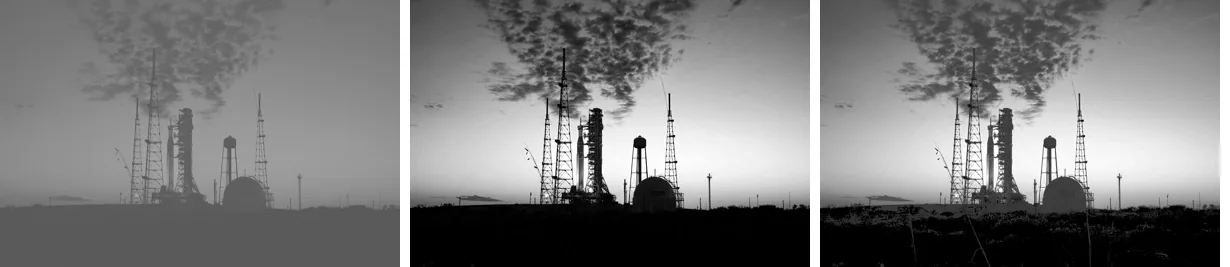
autocontrast(cutoff=1), equalize().The histograms show why they look different. autocontrast stretches the narrow band of tones to fill
0–255 and keeps its shape; equalize redistributes tones so each level is used about equally, which reveals
detail but also exaggerates noise.
Histograms recorded by the build from the three images above. Hover to read a value.
autocontrast() options
On a colour photo, a plain autocontrast stretches each channel separately, which changes the colour balance.
preserve_tone=True measures brightness only and applies one stretch to all channels:
from PIL import Image, ImageOps

# A washed-out colour photo: every channel squeezed into a narrow band, red more than blue.
src = Image.open("photo.jpg")
r, g, b = src.split()
dull = Image.merge("RGB", (r.point(lambda v: 60 + v // 3), g.point(lambda v: 50 + v // 2), b.point(lambda v: 40 + v // 2)))

plain = ImageOps.autocontrast(dull)
cut = ImageOps.autocontrast(dull, cutoff=2)           # ignore the darkest and brightest 2%
tone = ImageOps.autocontrast(dull, preserve_tone=True)  # stretch brightness only, keep the colour balance

for name, im in [("dull", dull), ("plain", plain), ("cutoff=2", cut), ("preserve_tone", tone)]:
print(f"{name:<14} per-channel range: {im.getextrema()}")dull per-channel range: ((60, 145), (50, 177), (40, 167))
plain per-channel range: ((0, 255), (0, 255), (0, 255))
cutoff=2 per-channel range: ((0, 255), (0, 255), (0, 255))
preserve_tone per-channel range: ((17, 208), (0, 255), (0, 255))Plain and cutoff push every channel to the full range, so a colour cast in the original is "corrected",
sometimes wrongly. With preserve_tone the channels keep their relative ranges. cutoff can also be a
(low, high) pair, ignore skips a background value, and mask measures only part of the image (for
example a face) while applying the result to all of it.
Tint with colorize()
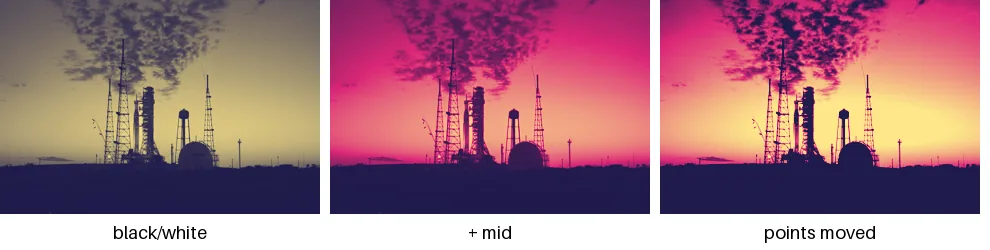
from PIL import Image, ImageDraw, ImageFont, ImageOps

grey = ImageOps.grayscale(Image.open("photo.jpg").resize((320, 214)))
variants = [
    ("black/white", ImageOps.colorize(grey, black="#1e1b4b", white="#fde68a")),
    ("+ mid", ImageOps.colorize(grey, black="#1e1b4b", white="#fde68a", mid="#db2777")),
    ("points moved", ImageOps.colorize(grey, black="#1e1b4b", white="#fde68a", mid="#db2777",
                                       blackpoint=40, whitepoint=200, midpoint=90)),
]
font = ImageFont.load_default(size=18)
sheet = Image.new("RGB", (3 * 330, 250), "white")
for i, (label, im) in enumerate(variants):
    sheet.paste(im, (i * 330, 0))
    ImageDraw.Draw(sheet).text((i * 330 + 160, 232), label, font=font, fill="black", anchor="mm")
sheet.save("colorize.png")colorize needs a greyscale (L) image. blackpoint, whitepoint and
midpoint are the grey levels (0–255) where each colour is reached exactly; tones beyond them are clamped.
posterize() and solarize()
from PIL import Image, ImageOps

photo = Image.open("photo.jpg")
for bits in range(1, 9):
    colours = len(ImageOps.posterize(photo, bits).getcolors(maxcolors=1 << 24))
print(f"bits={bits} {colours:>7} distinct colours")bits=1 8 distinct colours
bits=2 34 distinct colours
bits=3 147 distinct colours
bits=4 784 distinct colours
bits=5 4415 distinct colours
bits=6 23515 distinct colours
bits=7 90488 distinct colours
bits=8 137168 distinct coloursfrom PIL import Image, ImageOps
ramp = Image.new("L", (256, 1))
ramp.putdata(range(256)) # pixel x has the value x
for t in (128, 200):
out = ImageOps.solarize(ramp, threshold=t)
print(f"threshold={t}:", {x: out.getpixel((x, 0)) for x in (0, 100, 127, 128, 199, 200, 255)})threshold=128: {0: 0, 100: 100, 127: 127, 128: 127, 199: 56, 200: 55, 255: 0}
threshold=200: {0: 0, 100: 100, 127: 127, 128: 128, 199: 199, 200: 55, 255: 0}Values at or above the threshold are inverted (v becomes 255 - v); values below stay.
Palette images in Pillow 13
from PIL import Image, ImageOps

# A palette image with a transparent colour (index 1), like a GIF or a small PNG
src = Image.new("P", (100, 60), 1)
src.putpalette([0, 0, 0, 255, 0, 0, 0, 255, 0])
src.info["transparency"] = 1

padded = ImageOps.pad(src, (100, 100))
print("pad keeps the transparent colour:", padded.info.get("transparency"))
print("original area is still transparent:", padded.convert("RGBA").getpixel((50, 50))[3] == 0)
print("posterize on P:", ImageOps.posterize(src, 2).mode, " solarize on P:", ImageOps.solarize(src).mode)pad keeps the transparent colour: 1
original area is still transparent: True
posterize on P: P solarize on P: POn Pillow 13, invert, posterize and solarize accept palette images, and
pad and expand keep a palette image's transparent colour. We ran the same script on Pillow 12.3:
posterize raised NotImplementedError: mode P support coming soon, and pad dropped the
transparency, so the whole result became opaque. If your code must run on both, convert palette images to RGBA first.
Borders
from PIL import Image, ImageOps

img = Image.open("photo.jpg").resize((400, 267))
print("expand 20     ", ImageOps.expand(img, border=20, fill="white").size)
print("expand (l,t,r,b)", ImageOps.expand(img, border=(10, 40, 10, 0), fill="white").size)
print("crop 20       ", ImageOps.crop(img, border=20).size)

logo = Image.open("logo.png")                              # RGBA
framed = ImageOps.expand(logo, border=20)                  # no fill: the new border is transparent
print("RGBA border pixel:", framed.getpixel((5, 5)))expand 20 (440, 307)
expand (l,t,r,b) (420, 307)
crop 20 (360, 227)
RGBA border pixel: (0, 0, 0, 0)Without fill, expand uses 0, which is black for RGB and fully transparent for RGBA.
Removing a uniform border
ImageOps.crop(img, border=n) removes a fixed number of pixels. For a border of unknown width, compare against the
background colour and crop to the bounding box of what differs:
from PIL import Image, ImageChops

def trim(img, bg_color=None):
    """Remove a uniform border (e.g. white margins around a scan or chart)."""
    bg = Image.new(img.mode, img.size, bg_color or img.getpixel((0, 0)))
    bbox = ImageChops.difference(img, bg).getbbox()
    return img.crop(bbox) if bbox else img

padded = Image.new("RGB", (800, 600), "white")
padded.paste(Image.open("photo.jpg").resize((500, 333)), (120, 90))
print(padded.size, "->", trim(padded).size)(800, 600) -> (500, 333)Flip, mirror and EXIF rotation
from PIL import Image, ImageOps

img = Image.open("photo.jpg")
print("mirror == FLIP_LEFT_RIGHT:", ImageOps.mirror(img).tobytes() == img.transpose(Image.Transpose.FLIP_LEFT_RIGHT).tobytes())
print("flip   == FLIP_TOP_BOTTOM:", ImageOps.flip(img).tobytes() == img.transpose(Image.Transpose.FLIP_TOP_BOTTOM).tobytes())

phone = Image.open("phone.jpg")                            # stored sideways, EXIF orientation 6
upright = ImageOps.exif_transpose(phone)                   # returns a new, upright image
print("exif_transpose:", phone.size, "->", upright.size, " tag removed:", upright.getexif().get(0x0112) is None)
result = ImageOps.exif_transpose(phone, in_place=True)     # rotates `phone` itself
print("in_place returns", result, " phone is now", phone.size)mirror == FLIP_LEFT_RIGHT: True
flip == FLIP_TOP_BOTTOM: True
exif_transpose: (1200, 800) -> (800, 1200) tag removed: True
in_place returns None phone is now (800, 1200)exif_transpose is the function to call on every photo from a phone before resizing or cropping; see
EXIF orientation.
exif_transpose(): every EXIF orientation, applied
Cameras and phones often store the pixels as the sensor read them and add an EXIF Orientation tag (values 1 to 8)
saying how to turn them for display. Browsers and photo apps obey the tag; Pillow gives you the stored pixels until you call
exif_transpose():
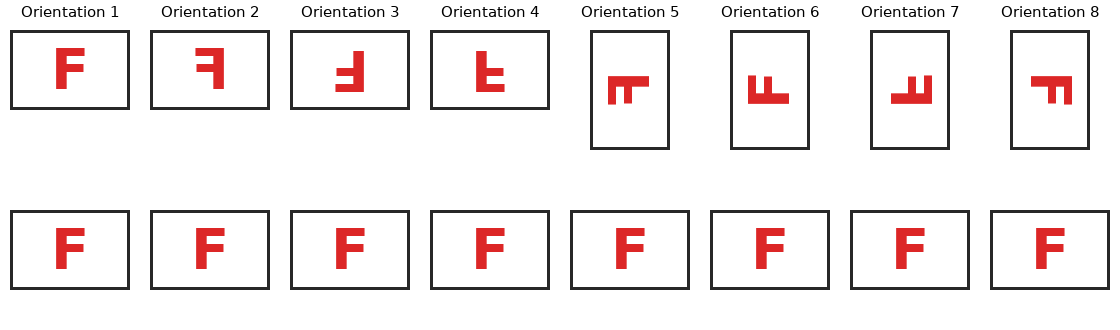
ImageOps.exif_transpose().from PIL import ExifTags, Image, ImageChops, ImageDraw, ImageFont, ImageOps
# A test card with an "F". For each Orientation value, store it the way a camera would: pixels turned or mirrored,
# plus the tag that says how to undo that. exif_transpose() must bring every one back to the upright card.
card = Image.new("RGB", (120, 80), "white")
d = ImageDraw.Draw(card)
d.rectangle((0, 0, 119, 79), outline=(40, 40, 40), width=3)
d.text((60, 40), "F", font=ImageFont.truetype("DejaVuSans-Bold.ttf", 56), fill=(220, 38, 38), anchor="mm")
T = Image.Transpose
camera = {1: None, 2: T.FLIP_LEFT_RIGHT, 3: T.ROTATE_180, 4: T.FLIP_TOP_BOTTOM, 5: T.TRANSPOSE,
6: T.ROTATE_90, 7: T.TRANSVERSE, 8: T.ROTATE_270}
sheet = Image.new("RGB", (8 * 140, 330), "white")
label = ImageFont.truetype("DejaVuSans.ttf", 15)
for o, op in camera.items():
stored = card.transpose(op) if op is not None else card.copy()
exif = stored.getexif()
exif[ExifTags.Base.Orientation] = o
stored.save(f"orient_{o}.png", exif=exif) # PNG keeps EXIF too, and is lossless
opened = Image.open(f"orient_{o}.png")
fixed = ImageOps.exif_transpose(opened)
upright = ImageChops.difference(fixed, card).getbbox() is None
print(f"orientation {o}: stored {opened.size} -> {fixed.size}, upright: {upright}, "
f"tag after: {fixed.getexif().get(ExifTags.Base.Orientation)}")
x = (o - 1) * 140 + 10
ImageDraw.Draw(sheet).text((x + 60, 12), f"Orientation {o}", font=label, fill="black", anchor="mm")
sheet.paste(opened, (x + (120 - opened.width) // 2, 30))
sheet.paste(fixed, (x, 210))
sheet.save("orientations.png")
phone = Image.open("phone.jpg")
print("in_place=True returns:", ImageOps.exif_transpose(phone, in_place=True), "| size now", phone.size)
plain = Image.open("logo.png")
print("no EXIF: returns a copy:", ImageOps.exif_transpose(plain) is not plain)orientation 1: stored (120, 80) -> (120, 80), upright: True, tag after: 1
orientation 2: stored (120, 80) -> (120, 80), upright: True, tag after: None
orientation 3: stored (120, 80) -> (120, 80), upright: True, tag after: None
orientation 4: stored (120, 80) -> (120, 80), upright: True, tag after: None
orientation 5: stored (80, 120) -> (120, 80), upright: True, tag after: None
orientation 6: stored (80, 120) -> (120, 80), upright: True, tag after: None
orientation 7: stored (80, 120) -> (120, 80), upright: True, tag after: None
orientation 8: stored (80, 120) -> (120, 80), upright: True, tag after: None
in_place=True returns: None | size now (800, 1200)
no EXIF: returns a copy: True- What it does: rotates and/or mirrors the pixels so the image looks the way the tag says, then removes the tag from the returned image's EXIF, so saving and opening it again cannot rotate it a second time. Values 5–8 swap width and height.
- Return value: always a new image (a copy even when there is nothing to do), or
Nonewithin_place=True, which changes the image itself. - When to call it: right after
open(), beforeresize(),thumbnail(),crop()or reading the size. Phone photos otherwise come out sideways (measured in the resize guide).
Custom distortions: deform()
deform takes any object with a getmesh(image) method that returns a list of
(target box, source quadrilateral) pairs. Pillow fills each target box from its quad, so a fine grid of slightly shifted quads
gives a smooth distortion:
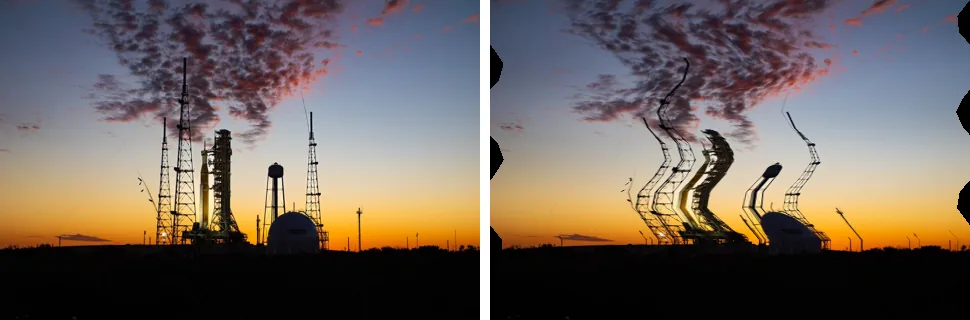
ImageOps.deform(img, Wave()).import math
from PIL import Image, ImageOps
class Wave:
"""A deformer: getmesh() returns (target box, source quad) pairs that ImageOps.deform maps with MESH."""
def __init__(self, amplitude=14, wavelength=90, step=16):
self.a, self.w, self.step = amplitude, wavelength, step
def shift(self, y):
return self.a * math.sin(2 * math.pi * y / self.w)
def getmesh(self, img):
w, h = img.size
s = self.step
mesh = []
for y in range(0, h, s):
for x in range(0, w, s):
box = (x, y, x + s, y + s)
# source corners: upper-left, lower-left, lower-right, upper-right
quad = (x + self.shift(y), y, x + self.shift(y + s), y + s,
x + s + self.shift(y + s), y + s, x + s + self.shift(y), y)
mesh.append((box, quad))
return mesh
img = Image.open("photo.jpg").resize((480, 320))
wavy = ImageOps.deform(img, Wave())
side = Image.new("RGB", (970, 320), "white")
side.paste(img, (0, 0))
side.paste(wavy, (490, 0))
side.save("deform.png")
print(wavy.size, wavy.mode)The quad corners are listed upper-left, lower-left, lower-right, upper-right, in source coordinates. The same mesh idea is
behind lens correction and page de-warping; for straight-line transforms, use
transform() instead.
Not every function accepts RGBA
from PIL import Image, ImageOps

logo = Image.open("logo.png")          # RGBA
ImageOps.invert(logo)OSError: not supported for mode RGBASplit off the alpha channel, process the colour bands, and put the alpha back:
from PIL import Image, ImageOps

logo = Image.open("logo.png")
r, g, b, a = logo.split()
rgb = ImageOps.invert(Image.merge("RGB", (r, g, b)))
inverted = Image.merge("RGBA", (*rgb.split(), a))      # keep the original transparency
print(inverted.mode, inverted.getpixel((300, 180)), "alpha kept:", inverted.getpixel((5, 5))[3] == 0)RGBA (218, 156, 20, 255) alpha kept: TrueAll ImageOps functions in Pillow 13.0.0
Generated from the installed Pillow when this page was built: every public function with its real signature. The build fails if Pillow adds a function we have not described.
ImageOps 18
| Name and signature | What it does |
|---|---|
autocontrast(image, cutoff=0, ignore=None, mask=None, preserve_tone=False) | Stretches the tones so the darkest pixel becomes black and the brightest white. cutoff ignores a share of extreme pixels, preserve_tone keeps colour balance, mask limits which pixels are measured. Example |
colorize(image, black, white, mid=None, blackpoint=0, whitepoint=255, midpoint=127) | Maps a greyscale image onto a gradient between two (or three, with mid) colours; the points move where each colour sits. Example |
contain(image, size, method=Resampling.BICUBIC) | Resizes to fit inside a box, keeping the aspect ratio; may enlarge. Example |
cover(image, size, method=Resampling.BICUBIC) | Resizes to cover a box completely, keeping the aspect ratio; one side ends up larger than the box. Example |
crop(image, border=0) | Removes a fixed number of pixels from every edge. Example |
deform(image, deformer, resample=Resampling.BILINEAR) | Distorts an image with a deformer object whose getmesh() returns target boxes and source quads. Example |
equalize(image, mask=None) | Spreads the tones so every brightness level is used about equally; mask limits which pixels are measured. Example |
exif_transpose(image, *, in_place=False) | Rotates or flips an image so it is upright according to its EXIF Orientation tag, and removes the tag. in_place=True changes the image itself. Example |
expand(image, border=0, fill=0) | Adds a border; border is one number or (left, top, right, bottom). Without fill, an RGBA border is transparent. Example |
fit(image, size, method=Resampling.BICUBIC, bleed=0.0, centering=(0.5, 0.5)) | Resizes and crops to exactly the requested size; centering chooses which part is kept and bleed trims the edges first. Example |
flip(image) | Turns the image upside down (top to bottom). Example |
grayscale(image) | Converts to greyscale (mode L), the same as convert("L"). |
invert(image) | Makes a negative. RGB, L, 1 and, since Pillow 13, P images; not RGBA. Guide |
mirror(image) | Flips left to right. Example |
pad(image, size, method=Resampling.BICUBIC, color=None, centering=(0.5, 0.5)) | Resizes to fit inside a box, then pads with color to exactly that size; centering places the image. Example |
posterize(image, bits) | Keeps only the top bits of each channel, reducing the number of colours. Example |
scale(image, factor, resample=Resampling.BICUBIC) | Resizes by a factor, keeping the aspect ratio. Example |
solarize(image, threshold=128) | Inverts every value at or above threshold, a darkroom effect. Example |
Sources
What this page shows comes from running its code with Pillow 13.0.0. The API details and version history were checked against these primary sources:
Related
The outputs and images on this page are the real results of running every example with Pillow 13.0.0 on Python 3.13 (Linux) on 2026-10-29. Every example is also re-run automatically on macOS (Darwin 25.6.0, Pillow 12.3.0), Linux (Linux 6.17.0-1022-azure, Pillow 12.3.0), Windows (Windows 2025Server, Pillow 12.3.0); the line under each example shows the result per operating system. The DejaVu Sans font files sit next to each script so font examples behave the same everywhere. Sample photos: NASA/Sam Lott, public domain. Spotted something wrong? Tell us.