Pillow ImageFilter Module
Independent quick-reference. Canonical source: official ImageFilter module documentation.
The ImageFilter module contains definitions for a number of predefined image enhancement and convolution filters, which can be applied with the Image.filter() method.
Blur Filters
| Filter | Parameters | Description |
|---|---|---|
BLUR | — | Simple box blur kernel. Equivalent to BoxBlur with small radius. |
GaussianBlur(radius=2) | radius: float or (x,y) tuple | Gaussian blur using a weighted kernel. Higher radius = more blur. Most realistic blur for photography. |
BoxBlur(radius) | radius: float or (x,y) tuple | Each output pixel is the average of the square neighbourhood. Faster than Gaussian for large radii. |
Edge Detection & Contour Filters
| Filter | Description |
|---|---|
CONTOUR | Find image contours. Produces a white image with dark contour lines — ideal for sketching effects. |
EDGE_ENHANCE | Enhance edges. Subtle — creates a look similar to slight over-sharpening. |
EDGE_ENHANCE_MORE | More aggressive edge enhancement. |
FIND_EDGES | Detects sharp edges. Produces a black image with white edge lines. Good for preprocessing for OCR or CV. |
EMBOSS | Emboss the image. Creates a raised relief effect. |
Rank Filters
Rank filters pick a specific ranked pixel value from a neighbourhood. Useful for noise reduction and morphological operations.
| Filter | Description |
|---|---|
MedianFilter(size=3) | Picks the median pixel in the neighbourhood. Excellent for removing "salt and pepper" noise without blurring edges. |
MinFilter(size=3) | Picks the minimum (darkest) pixel. Acts as morphological erosion. |
MaxFilter(size=3) | Picks the maximum (brightest) pixel. Acts as morphological dilation. |
RankFilter(size, rank) | General rank filter. rank=0 = Min, rank=size*size//2 = Median, rank=size*size-1 = Max. |
Custom Kernel Filter
Create arbitrary convolution kernels with ImageFilter.Kernel(). The kernel is a flat list of values applied over a square neighbourhood.
| Parameter | Type | Description |
|---|---|---|
size | tuple[int,int] | Kernel size — must be odd, e.g., (3,3) or (5,5). |
kernel | sequence | A sequence of size[0]*size[1] kernel weights. Listed from top-left, row by row. |
scale | int | Divisor applied to the output. Usually the sum of the kernel weights. |
offset | int | Added to each output value after scaling. |
All Predefined Filters
| Filter Constant | Type |
|---|---|
BLUR | Predefined |
CONTOUR | Predefined |
DETAIL | Predefined |
EDGE_ENHANCE | Predefined |
EDGE_ENHANCE_MORE | Predefined |
EMBOSS | Predefined |
FIND_EDGES | Predefined |
SHARPEN | Predefined |
SMOOTH | Predefined |
SMOOTH_MORE | Predefined |
GaussianBlur(radius=2) | Parameterizable |
BoxBlur(radius) | Parameterizable |
UnsharpMask(radius=2, percent=150, threshold=3) | Parameterizable |
Kernel(size, kernel, scale, offset=0) | Custom convolution |
RankFilter(size, rank) | Rank |
MedianFilter(size=3) | Rank |
MinFilter(size=3) | Rank |
MaxFilter(size=3) | Rank |
ModeFilter(size=3) | Rank |
Color3DLUT(size, table) | 3D LUT colour transform |
MultibandFilter | Base class for multi-band filters |
BuiltinFilter | Base class for built-in filters |
Filter | Abstract base class |
Tested examples
Everything in this section was run with Pillow 12.3.0; the images and numbers are the real output. Sample photo: NASA/Sam Lott, public domain.
The built-in filters side by side
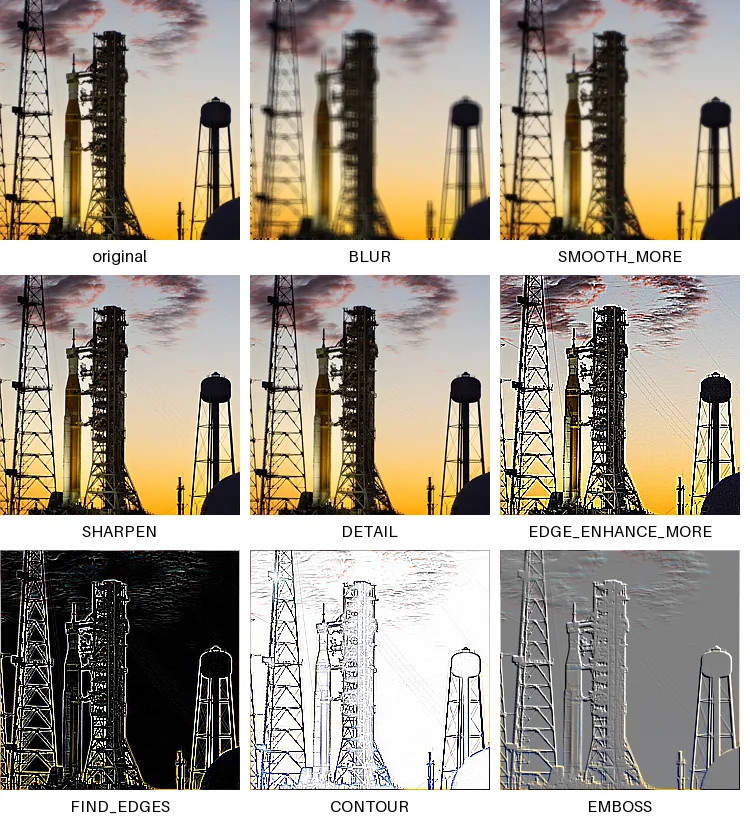
from PIL import Image, ImageDraw, ImageFilter

src = Image.open("photo.jpg").crop((560, 380, 960, 780)).resize((240, 240))
filters = ["BLUR", "SMOOTH_MORE", "SHARPEN", "DETAIL", "EDGE_ENHANCE_MORE",
           "FIND_EDGES", "CONTOUR", "EMBOSS"]
cells = [("original", src)] + [(name, src.filter(getattr(ImageFilter, name))) for name in filters]

cols = 3
sheet = Image.new("RGB", (cols * 250, 3 * 275), "white")
draw = ImageDraw.Draw(sheet)
for i, (label, im) in enumerate(cells):
    x, y = (i % cols) * 250, (i // cols) * 275
    sheet.paste(im, (x, y))
    draw.text((x + 120, y + 256), label, fill="black", anchor="mm", font_size=16)
sheet.save("filters.png")GaussianBlur vs BoxBlur: speed
import time
from PIL import Image, ImageFilter

img = Image.open("photo.jpg")
for radius in [2, 10, 40]:
    times = {}
    for name, f in [("GaussianBlur", ImageFilter.GaussianBlur(radius)), ("BoxBlur", ImageFilter.BoxBlur(radius))]:
        t = time.perf_counter()
        img.filter(f)
        times[name] = (time.perf_counter() - t) * 1000
print(f"radius {radius:>2}: GaussianBlur {times['GaussianBlur']:6.1f} ms BoxBlur {times['BoxBlur']:6.1f} ms")radius 2: GaussianBlur 76.3 ms BoxBlur 24.9 ms
radius 10: GaussianBlur 55.1 ms BoxBlur 32.0 ms
radius 40: GaussianBlur 62.6 ms BoxBlur 26.5 msBoth run in roughly constant time as the radius grows, because Pillow approximates the Gaussian with repeated box blurs;
a single BoxBlur pass was about twice as fast here. BoxBlur looks blockier at large radii; use GaussianBlur unless you have measured that the difference
matters.
SHARPEN vs UnsharpMask
from PIL import Image, ImageFilter

src = Image.open("photo.jpg").crop((980, 360, 1100, 480))          # lattice tower detail
variants = [("original", src),
            ("SHARPEN", src.filter(ImageFilter.SHARPEN)),
            ("Unsharp r=2 150%", src.filter(ImageFilter.UnsharpMask(radius=2, percent=150, threshold=3))),
            ("Unsharp r=4 300%", src.filter(ImageFilter.UnsharpMask(radius=4, percent=300, threshold=0)))]
sheet = Image.new("RGB", (4 * 250 - 10, 240), "white")
for i, (label, im) in enumerate(variants):
    sheet.paste(im.resize((240, 240), Image.NEAREST), (i * 250, 0))
sheet.save("unsharp.png")
print([label for label, _ in variants])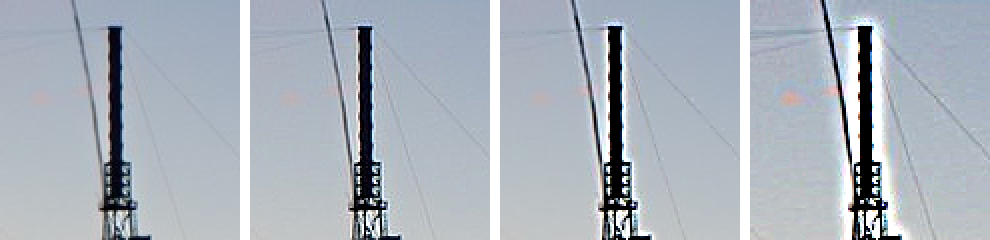
SHARPEN, UnsharpMask(2, 150, 3), UnsharpMask(4, 300, 0).SHARPEN is a fixed 3×3 kernel. UnsharpMask lets you set the size of the detail
(radius), the strength (percent) and a threshold below which differences are left alone,
which keeps noise and smooth skies from being sharpened. Overdo it and light halos appear along edges, as on the right.
Removing speckle noise: MedianFilter
import random
from PIL import Image, ImageFilter

clean = Image.open("photo.jpg").convert("L").resize((400, 267))
noisy = clean.copy()
px = noisy.load()
random.seed(1)
for _ in range(4000):                                              # salt-and-pepper noise
    px[random.randrange(400), random.randrange(267)] = random.choice((0, 255))


def err(a, b):
    return sum(abs(x - y) for x, y in zip(a.get_flattened_data(), b.get_flattened_data())) / (a.width * a.height)


for name, out in [("noisy", noisy), ("GaussianBlur(1)", noisy.filter(ImageFilter.GaussianBlur(1))),
                  ("MedianFilter(3)", noisy.filter(ImageFilter.MedianFilter(3)))]:
print(f"{name:<16} mean error vs clean: {err(out, clean):5.2f}")noisy mean error vs clean: 4.66
GaussianBlur(1) mean error vs clean: 6.36
MedianFilter(3) mean error vs clean: 2.09A blur only spreads isolated black and white specks around; a median filter replaces each pixel with the middle value of
its neighbourhood, so outliers disappear. The other rank filters, MinFilter and MaxFilter, erode and
dilate masks.
Blurring transparent images without dark edges
from PIL import Image, ImageDraw, ImageFilter

disc = Image.new("RGBA", (100, 100), (0, 0, 0, 0))                # transparent pixels store black
ImageDraw.Draw(disc).ellipse((20, 20, 80, 80), fill=(255, 255, 255, 255))

straight = disc.filter(ImageFilter.GaussianBlur(6))
premult = disc.convert("RGBa").filter(ImageFilter.GaussianBlur(6)).convert("RGBA")
print("edge pixel, blurred as RGBA:", straight.getpixel((50, 17)))
print("edge pixel, blurred as RGBa:", premult.getpixel((50, 17)))edge pixel, blurred as RGBA: (80, 80, 80, 80)
edge pixel, blurred as RGBa: (255, 255, 255, 80)Fully transparent pixels still store a colour, usually black. Blurring RGBA mixes that colour into the edges, so a white
shape gets a grey fringe. Converting to RGBa (premultiplied alpha) first, and back afterwards, blurs correctly.
Which modes can be filtered
from PIL import Image, ImageFilter

photo = Image.open("photo.jpg")
for mode in ["RGB", "L", "RGBA", "P", "1", "I;16", "F"]:
    img = photo.convert("I").convert("I;16") if mode == "I;16" else photo.convert(mode)
    row = []
    for f in [ImageFilter.SHARPEN, ImageFilter.GaussianBlur(2), ImageFilter.MedianFilter(3)]:
        try:
            img.filter(f)
            row.append("ok")
        except ValueError as e:
            row.append(str(e))
print(f"{mode:<5}", " | ".join(f"{r:<27}" for r in row))RGB ok | ok | ok
L ok | ok | ok
RGBA ok | ok | ok
P cannot filter palette images | image has wrong mode | cannot filter palette images
1 ok | image has wrong mode | ok
I;16 ok | image has wrong mode | image has wrong mode
F image has wrong mode | image has wrong mode | okPalette images cannot be filtered at all: convert to RGB or RGBA first. GaussianBlur
needs 8-bit channels, so it also rejects 1-bit, 16-bit and float images. For 16-bit and float data, NumPy and SciPy
(scipy.ndimage) are the better tools.